How to manage leg lacerations that require bandaging

The dribble of blood down your horse’s leg certainly puts a damper on your morning riding plans. Taking a closer look, you see the culprit is more than a scrape, as the wound extends into deeper layers of the skin just above the fetlock. It doesn’t look bad enough to need sutures, but you do want to keep it clean and help it heal. So, aside from postponing that ride a few days, what do you do?
First and foremost, call your veterinarian or text a photo of the wound so he or she can gauge its severity. Wounds near joints risk contaminating the surrounding synovial structures and warrant professional evaluation. Otherwise, your veterinarian can guide your next steps.
Here we will take an in-depth look at wound care—specifically for when the injury is on a horse’s leg.
Cleaning a Wound
If you have a horse that is accepting of you touching and probing a wound, then you might be able to remove debris and contamination simply with a good cleaning job.
“Any lavage (washing or flushing out) is fine, even if you just use tap water,” says Erin Denney-Jones, DVM, owner of Florida Equine Veterinary Services, near Orlando. “Sterile saline with or without (the antiseptics) Betadine (povidone iodine) or chlorhexidine solution is great, but usually all an owner has available is a garden hose to spray the wound.”
When using antiseptic solutions, it’s best to dilute them because full-strength concentrations are toxic to the tissues you’re trying to treat. For dilution, add 20-25 milliliters of chlorhexidine or 10 milliliters of Betadine per quart of water.
“Don’t use hydrogen peroxide, as it is known to displace and kill cells and also causes pain when applied, so a horse could become quite reactive,” says Denney-Jones. “Peroxide has a good role for cleaning blood off the leg (not directly on the wound) or from clothing.”
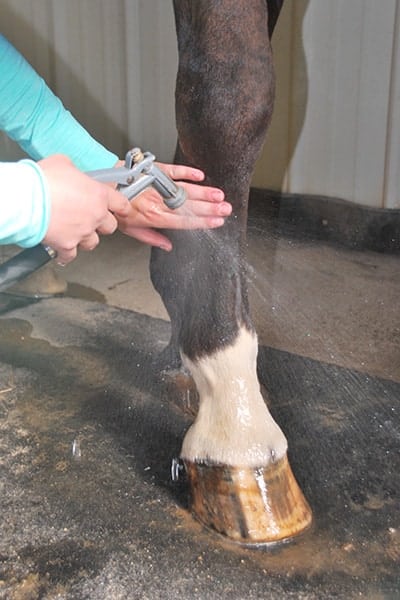
Once you’ve removed the bulk of contaminants, you can then gently clean the wound with antiseptic soap (chlorhexidine or povidone iodine) if your horse allows. It is important to rinse thoroughly to prevent the soap from damaging the skin’s keratin cells.
Conversely, if your horse has a hissy fit if you even attempt to look at his wound, then you’d be safer just spraying it with a hose or waiting until your veterinarian can tend to it. No wound is reason to risk getting hurt.
Check your records to be sure your horse received his most recent immunization against the life-threatening disease tetanus within the past year. If you don’t know your horse’s immunization status, have your veterinarian boost the vaccine using tetanus toxoid.
We’ll continue this article assuming your horse is willing to allow you hands-on access to his wound.
Bandaging the Wound
Once you’ve cleaned the wound as best as possible, let it air dry while you gather your bandaging materials. Denney-Jones recommends bandaging all wounds that are more than an abrasion or a scrape and located below the knees or hocks to help reduce swelling. A bandage serves several purposes:
- Protection from contamination and insects;
- Tissue support;
- Stability; and
- Warmth.
All these ingredients help create an optimal environment for healing. While it’s difficult to impossible to speed up healing, there are many ways to slow or compromise it. The objective is to “do no harm.”
“My go-to bandage (if the wound is contaminated) is to use a wet-to-dry application,” says Denney-Jones. “Using dilute Betadine or chlorhexidine, lightly soak gauze, place that directly on the wound, and then wrap appropriately. At the bandage change the damp gauze debrides the wound, which is then wiped gently to remove moisture or discharge. The tissue then looks clean and ready for a new bandage application.”
Another technique involves applying water-soluble antiseptic salves and a nonstick dressing to the wound, covering it with padding, and applying sticky bandage material to hold it all in place.
In some cases, such as in wet, rainy, or snowy environments, it helps to apply a double bandage to keep the inner layer dry and contaminant-free for as long as possible. This means applying a bandage over the wound, then applying another, less-bulky bandage over the first one.
Denney-Jones practices in a subtropical climate, which is much more humid than where I reside in Colorado and makes for unique differences in wound management.
“Our warm and moist environment favors bacterial and fungal growth, which interfere with wound healing,” she explains. “We also have a problem with pythiosis (a skin infection) if a horse immerses a wound in a pond or lake when they go for a drink. The nickname for the skin problem is ‘Florida leeches,’ although it is (caused by) a fungal organism that is more aggressive than summer sores (habronemiasis caused by skin deposits of Habronema stomach fly larvae) and difficult to treat. With that in mind, if a wound is bandaged or if there are any open sores, it is best to keep those areas clean and dry and lock the horse away from water sources such as ponds and creeks.”
Bandage Change Frequency
How frequently you change your horse’s bandage depends on the environment and the amount of wound discharge. “We change bandages daily at first, especially with seeping wounds because moisture is trapped beneath the bandage,” says Denney-Jones. “Once the wound progresses in its healing, we change it every two to three days. Sweat and skin sloughing create a gummy superficial discharge that is wiped clean with dilute chlorhexidine on a gauze pad.”

Don’t continue scrubbing a healing wound, however, as it can prevent skin cells from successfully populating the wound bed.
If you don’t have access to a clean surface for a bandage change, stand the affected limb on a towel, blanket, or sheet to eliminate soil and manure contamination.
Topical antiseptic salves can help keep tissues moist and pliable, while powders and sprays tend to dry tissue out, which is counterproductive in drier climates. Water-soluble products are best because they don’t hold in heat like petroleum-based ointments do, and you can wash them away easily. Only apply petroleum-based salves on the skin below a wound to prevent scalding from seeping serum. Be sure to talk to your veterinarian about what salve would be most appropriate for your horse’s wound.
“If a wound is sutured,” says Denney-Jones, “bandaging for the initial three to five days helps to decrease swelling and also deters a horse from chewing at the wound and removing the stitches.”
Anyone who has had to care for a wound that requires bandaging for extended periods knows how expensive this can be. Reusable bandaging materials are commercially available and can help cut down on costs at each bandage change.
You can stop bandaging once epithelial tissue (the basis of skin) forms across the entire wound. I like to keep a wound bandaged until it is about the size of a quarter and has a nice pink epithelial layer across it. Then, a protective spray such as an aerosol bandage (e.g., AluSpray) keeps flies away and protects the wound from dirt. In some situations, such as in moist climates, spray medication might trap sweat beneath, says Denney-Jones, whereas in drier climates it can be helpful.
Bandaging Techniques
As you put on a bandage, apply light compressions to help deter proud flesh and swelling. Denney-Jones advises owners to be aware of bony prominences (sesamoid bones, carpal accessory bone at the back of the knee, the point of the hock) when bandaging. Protect these areas with cotton padding before applying a bandage; otherwise, the pressure could create difficult-to-heal sores.
Use cotton quilts or roll cotton padding along long bones and over joints to create a snug bandage that doesn’t compromise blood supply or tendons. Pull bandaging material across the front surface of long bones and joints while laying (not pulling) it across the back tendinous surfaces. If cotton or quilts aren’t available, feminine hygiene pads or baby diapers can serve as useful padding to protect skin and tendons from bandage pressure.
The direction you apply a bandage shouldn’t matter. Bandage the leg in whatever manner is most comfortable for you and achieves the desired effect of consistent covering and light compression. What’s most important is that you apply it with even tension and without wrinkles and ensure it isn’t too tight or too loose. If too tight, the bandage can compress tissues and compromise blood supply. If too loose, it’ll sag and potentially slip down, which can scare a horse into reacting violently and inflicting self-injury.
Once you’ve placed a bandage over a long bone with or without incorporating a joint, place elastic tape (such as Elastikon) around the top and bottom of the bandage. It helps to incorporate a joint above and/or below the bandage to avoid slippage.
“Stacking” is another useful technique for preventing bandage slippage. Take, for example, a carpal (knee) wound: “First place a full bandage (or a standing wrap) from the top of the cannon bone to incorporate the fetlock,” says Denney-Jones. “Then apply the carpal bandage over the wound, and include ample cotton padding on the back of the knee over the accessory carpal bone to protect against rubs or pressure sores. Then connect the carpal bandage directly to the cannon bandage—the secure cannon bandage holds the carpal bandage in place.” You can also use the stacked method on hind limbs to keep bandages from slipping.
For hock injuries, you’ll probably want your veterinarian to bandage these or at least instruct you on the best method. It helps to pad the point of the hock and the Achilles tendon with cotton, then wrap the entire area from gaskin (the area between the stifle and the hock) to below the hock. A stretchy sticky tape like Elastikon has give and elasticity that protect against tissue constriction. Once you’ve encased the hock in bandaging material, be aware that the horse might react to feeling that constriction upon first walking forward. Some raise the bandaged rear leg in protest, hop around without regard to obstacles or people, and are at risk of falling. To prevent this, after placing the hock bandage I immediately but gently back the horse up until he stops reacting to the bandage. This greatly reduces the risk of him falling or kicking or further injuring himself. Ensure there is plenty of room to back a horse, and make sure all people and pets are out of the way.
Bandaging a foot requires a few tricks to keep the bandage from riding up. Denney-Jones prefers to incorporate the entire foot in a bandage to prevent the material from rolling. I have had great success creating a figure-eight configuration across the heel bulbs. Then you can apply a hoof boot (with cotton sticking up the sides to keep shavings or dirt from getting in the boot) to further secure the bandage in place. Change the boot daily to remove debris and apply clean cotton. If confinement isn’t necessary for optimal wound healing—and the boot is designed for turnout—you can turn the horse out wearing the boot.
Signs of Poor Healing
It’s important to look for signs of problems throughout the wound-healing process. “If you (notice) swelling, pus, a bad odor, or feel abnormal heat in the leg, it is appropriate to contact your veterinarian with a phone call and/or by emailing or texting a photograph of the injury,” says Denney-Jones. “Not all correspondence with your vet is going to cost you (a farm call); it’s better to discuss the injury and then schedule an appointment if it seems appropriate for your horse to receive professional care.”
Another sign of a big problem is visible bone. Exposed bone is susceptible to infection, and it is important for granulation tissue to form over the top of the bone as soon as possible. However, excessive amounts of proud flesh covering a wound might obscure your ability to see inside. A wound that continues to produce proud flesh and is not healing usually indicates deeper infection or a bone sequestrum (a dead piece of bone that has separated off the parent bone and lost its blood supply).
“A wound that doesn’t heal after about six weeks should be radiographed (X rayed) to look for a sequestrum that likely requires surgical removal,” says Denney-Jones. Other issues that can deter or delay wound healing include:
- Infection;
- Flies, including fly larvae that create summer sores in certain climates; or
- Foreign bodies such as wood splinters, metal, thorns, or seeds.
Denney-Jones recommends owners in the southeastern U.S. cover horse wounds in late spring, summer, and early fall to shield them from flies. In drier climates it’s still smart to cover wounds during these periods to keep out dirt and insects and prevent tissue from dehydrating.
Take-Home Message
With direction and practice, you can become a wound bandaging wizard. Bandaging is important for creating an environment in which tissue can heal. The main ingredient for successful healing is keeping the wound clean. If you have any doubt about a wound’s seriousness or condition, call your veterinarian. Take a photo, email or text it to your vet, and then keep the wound covered until you can receive professional advice or care.