How to Tarp Hay for Winter Storage
- Topics: Article, Farm and Barn, Feed Storage, Hay, Nutrition, Nutrition Basics

Hay has become a hot commodity. It’s challenging to locate good hay, and it’s expensive when you find it. When you do locate a good source, it’s important to get your hay supply in and protected so it stays in good condition and lasts through the winter. Depending on where you live in North America, next year’s hay crop might not be available until June through October. Plus, it can be difficult, expensive, and very stressful sourcing hay in the spring if you run low – speaking from experience!
As a horse business owner who needs to purchase around 40 tons of hay each year to get my crew of horses through the winter, I’ve seen all sorts of ways to stack it – with mixed results. In many cases I can tell the hay in some stacks is no longer of the caliber I’d want to feed to my horses.
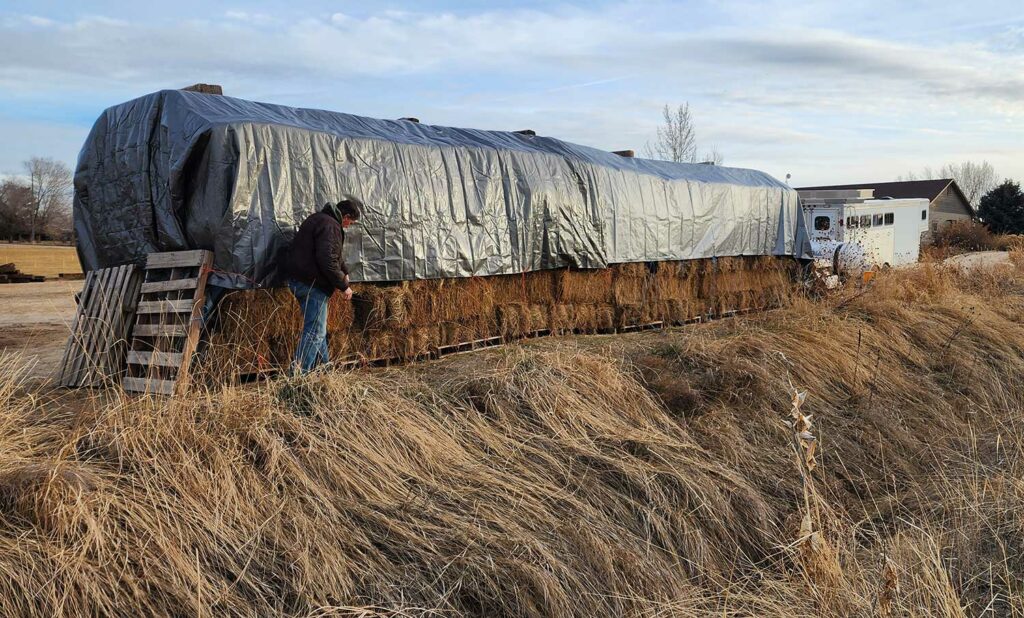
This past fall was the first year we had to stack/tarp hay outside of our hay barn. We had to scramble to figure out how to do this correctly so the 20 tons we were stacking outdoors wasn’t lost to rain and mold during the winter.
Preparing Your Stack
“Hay is a major investment,” said Sandy Young, owner of Treasure Valley Hay, in Nampa, Idaho. Young has been a hay broker since 2008, focusing primarily on southwestern Idaho, but with customers in all Western states. “You’re investing in high-quality food to keep your animals healthy and give you peace of mind knowing you have what you need to carry you through the winter until next summer.”
Protecting your investment with a heavy-duty, high-quality tarp is critical. “If you don’t at least cover the top of the stack with a good tarp, moisture from rain and snow will seep into the stack from the top down to the bottom and could ruin all the hay,” she said.
Where you locate your stack is important. As with other structures on your horse property, place your haystack in a high, well-drained area. Make it easy to access for the initial delivery people, as well as efficient for you as you use the hay.
You’ll need to place the stack on a barrier or structure to protect the bottom bales. Hay placed directly on the ground will wick up moisture, ultimately molding and rotting on the bottom. “Start with wood or plastic pallets, or a thick, dense layer of flakes of straw,” said Young. “If you do need to put your stack directly on the ground, be sure to place the cut edge of the bale down, strings to the side, so damaged hay will be easier to pick off.”
“We try to stack hay so the exposed sides of the stack are (uniformly) straight, up and down, with no ledges,” said Young. “We also try to overlap the bottom bales on the pallets, so the hay bales just hang over the edge (of the pallet) a little bit. That way rain and snow won’t settle on the (pallet) boards and wick moisture back under the bale, causing superficial damage.”
You can make your hay-stack as tall as you want. If you are hand-stacking, it will probably be four to eight layers high. If your hay is delivered by equipment, such as a haystack retriever, it will be in a prestacked amount, usually nine layers high, and it won’t need to be readjusted. The weight will vary but is usually 3 to 5 tons.
Choosing The Right Tarp
“Prep the top of your stack with a single row of bales laid end to end, across the middle of the top,” said Young. “This will form a peak (once the tarp is placed across it) so the pile sheds water like a roof and you won’t get puddles which eventually leak.” Tarps are not 100% waterproof. “Don’t set anything on top to hold the tarp down,” she added. “It creates a depression that causes water to puddle, which is likely to cause leaking.”
The way you spread and secure the tarp is crucial to the lasting quality of the hay. “I’ve seen all sorts of ways to do this,” said Young. Her suggestions include using long nail spikes and pushing them through the tarp grommets into the hay, kind of like “nailing” the tarp into the hay. You can also screw dog tie-out stakes into the hay and attach them to the tarp. Rubber bungees, ropes, and bailing twine can also be used to secure the tarp. Young said she prefers to create bailing twine loops with long tails that she secures to the pallets prior to building the stack. These can simply be used to cinch the tarp down once everything is in place. “Wind is the biggest enemy of your tarp,” she noted. “Tie your tarp snug, and don’t let it flap in the wind.”
“You can get a tarp big enough to cover the stack completely, all the way to the ground,” she added. “Or get one that’s just big enough to go over the (top) edges and down the sides at least a couple of feet. If the ends of the bales (on the sides of the stack) are not covered, they’ll get weathered, which is okay, unless there’s a hay ledge that snow or rain settles on and soaks into.”
Weathered hay that’s merely discolored is fine to feed horses. Wet and moldy is not. “Get a good heavy-weight tarp with lots of grommets. Do not get a lightweight, cheap tarp, you’ll regret it,” said Young.
“A good, heavy tarp should last three to five years,” said Brad Jensen, a dealer in Western Ag hay tarps, the flagship blue and white tarps used by commercial hay growers and dairy owners. “Use a good-quality tarp, create a peak (at the top of your stack), keep the tarp tight, and take care of it so it extends the life of the tarp.”
Western Ag tarps have boards and a rope sewn into them. “The rope is attached to the board, so you aren’t just pulling on a grommet that can rip out,” said Jensen.
The biggest reason tarps wear out is they aren’t tied properly, and when they are flailing around in the wind they break down. “Tie the tarp down and keep it tight,” said Jensen. “This helps them last longer. If you want to reuse the tarp for next year, clean it up and fold it up nicely. We usually hang them on a wall where the mice won’t nest and make holes in them.”
If your stack is two pallets wide, the tarp should be a minimum of 12 feet wide. “That’ll give you a 1-2 foot overhang of the tarp on the stack’s sides,” said Young. “If the tarp is too big, it will be heavy and bulky, and difficult to manage.” Young suggested working with multiple smaller tarps that are at least 24 feet long and overlapping them. This is especially useful once you start to take hay from the stack.
“If you use multiple tarps, overlap them by at least a 4-foot minimum, with the opening facing away from the prevailing winds and downhill,” she said. This will hopefully prevent water and snow from working its way under the tarp and ruining the hay.
“Check the ties often, and keep them taut,” she added. To extend the tarp’s life span, Young suggested placing an old tarp, sheets, towels, or horse blankets as padding beneath it (along edges or on corners of the stack). This reduces the friction created by the wind rubbing the tarp against the hay.
Like many other things on a horse property, stacking and tarping hay for winter storage can be a chore. “Take a deep breath and relax,” said Young. “At least you know you’ve got plenty of good hay.” And know that winter doesn’t last forever.

Written by:
Alayne Blickle
Related Articles
Stay on top of the most recent Horse Health news with


